How to Force a Game to Use Your GPU in Windows 11
Here’s how to force a game or application to use your graphics card or GPU in Windows 11 and make it run in High Performance mode.

If you have onboard graphics cards in your computer and a dedicated GPU, Windows 11 will decide to use one or the other. Generally, you’ll always want to use your dedicated GPU, but there are certain situations where you’ll want to set a game to run in high-performance mode. Here’s how to force a game to use a graphics card or GPU in Windows 11.
How to Force a Game or Application to Use Your GPU in Windows 11
To force a game or application to use your dedicated graphics card in Windows 11, go into the Windows Display settings, go to the Graphics section, search for the game or application, and set the Graphics preference to High performance.
Here’s a step-by-step guide on how to set a game or application to run in High performance mode on Windows 11:
- Open the Windows Start Menu and search for Settings.
- Click on Display in the Settings menu.
- Scroll down and go to Graphics.
- Search for the game or application using the search bar for which you want to change the settings.
- Click on the game or application name and select Options.
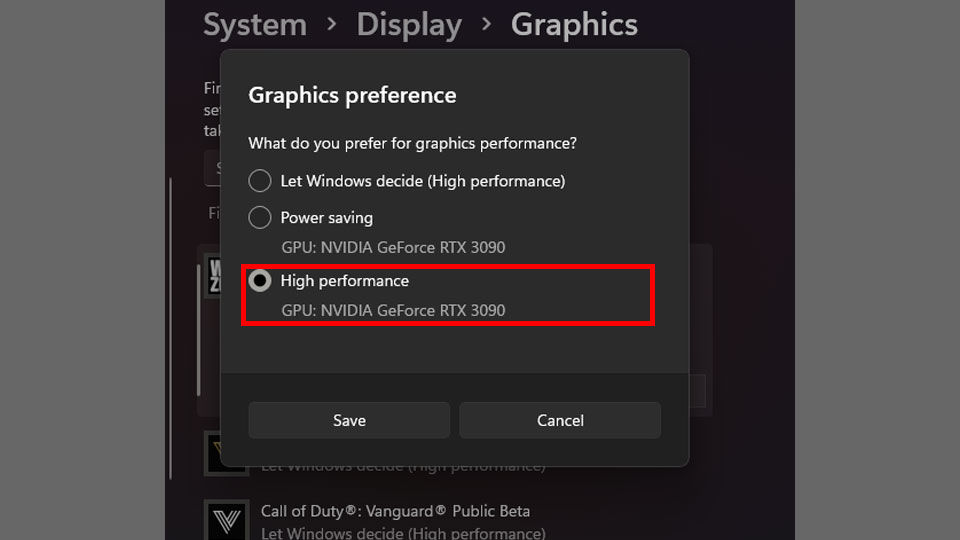
- On the Graphics preference menu, select High performance.
- Click Save.

Generally, the default Graphics preference for each application in Windows 11 is “Let Windows decide.” However, when you choose High performance, it will typically select your GPU. You’ll usually want to select High performance if you have a dedicated graphics card like an NVIDIA or AMD card.
If you’re on a laptop and facing power-draining or battery life issues, you might want to select Power saving mode instead. This is especially true for games that don’t demand much in the way of hardware.
For more Windows 11 guides and walkthroughs, visit our Windows Section.


