How to Transfer OBS Scenes to Another Computer
Have you finally upgraded your streaming PC? Here’s how to quickly and easily transfer your OBS scenes to another computer.

Open Broadcaster Software (OBS) is a simple-to-use open-source software application that enables users to easily capture video gameplay or stream on their favorite platform. If you’ve recently upgraded your streaming PC or want to have two setups capable of streaming or recording video, you may not want to put all that work into setting up your scenes again. Luckily for you, there’s a quick way to transfer OBS scenes to another computer. We’ll walk you through it step-by-step below.
How to Transfer OBS Scenes to Another Computer
To transfer OBS Scenes to another computer, save your Scenes from the OBS Scene Collection menu. From there, use a flash drive or cloud service like Dropbox to copy your Scene file to your new computer. See below for a step-by-step tutorial.
Saving Your OBS Scenes
You must save your OBS Scenes before you transfer them to another computer.
To save your OBS Scenes:
- Open OBS.
- Click Scene Collection.
- Select the profile with the Scenes you want to copy over.
- Click Export.
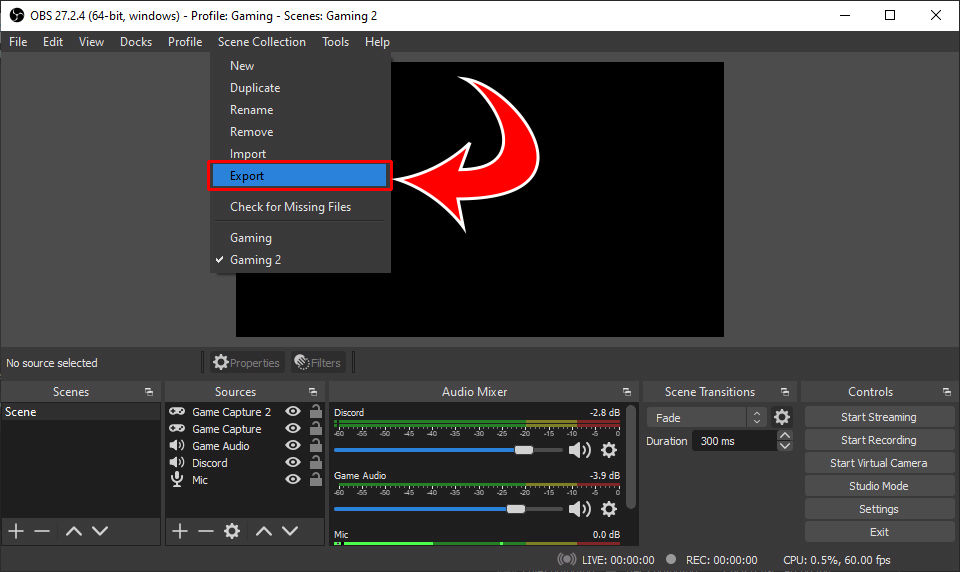
- Select a folder to save your Scenes.
- Click Save.
Now that your OBS Scenes have been saved, you can import them onto your new computer.
Transferring OBS Scenes to Another Computer on The Cloud
To transfer your OBS Scenes to another computer using cloud software:
- Navigate to your cloud software. We recommend something like Dropbox or Google Drive. You can also email the file to yourself.
- Click and drag the .json file in your cloud folder.
- Save the file on your new computer from the cloud.
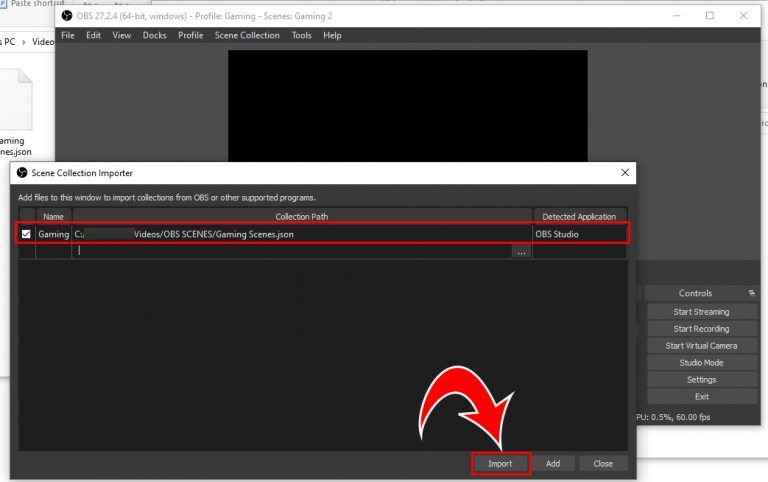
- Open OBS on the new computer.
- Click Scene Collection.
- Hit Import.
- Click No if OBS prompts you to auto-import scenes.
- Click the ⋯ icon under Collection Path.
- Navigate to your .json file and click Open.
-
Click Import. Under Detected Application it should say OBS Studio.
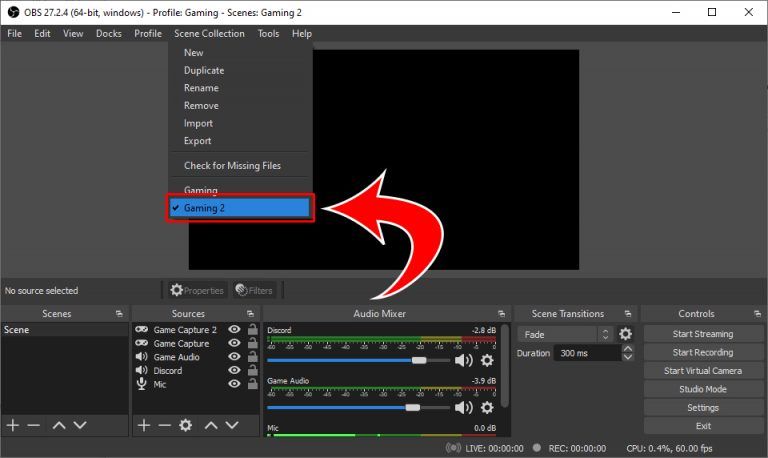
- Click Scene Collection again.
-
Select your newly imported Scenes.
Transferring OBS Scenes to Another Computer with a Flash Drive
To transfer your OBS Scenes with a flash drive:
- Find and click the OBS Scene .json file we saved in part 1.
- Copy the file by hitting CTRL+C (Windows) or CMD+C (Mac).
- Navigate and open your Flash Drive.
- Hit CTRL+V (Windows) or CMD+V (Mac) to paste your profile into your Flash Drive.
- Safely eject your Flash Drive once the files are finished copying.
- Plug the flash drive into your new computer.
- Open OBS on the new computer.
- Click Scene Collection.
- Hit Import.
- Click No if OBS prompts you to auto-import scenes.
- Click the ⋯ icon under Collection Path.
- Navigate to your .json file and click Open.
- Under Detected Application it should say OBS Studio.
- Click Import.
- Click Scene Collection again.
- Select your newly imported Scenes.


