How to Install Stable Diffusion Web UI on Your PC
Here’s how to install Stable Diffusion on your PC so you can start generating AI images.

The Stable Diffusion Web UI is a way to create AI-generated images easily. The one-click installer will set up a browser interface based on the Gradio library for Stable Diffusion. We put together this guide so that non-technical readers can easily understand how to install Stable Diffusion Web UI on a computer.
Before we start, you will need to download Git and Python. You are ready to start if you already have those on your computer. Otherwise, you can download Git for Windows here and Python here. Install both programs. For Python, we’re using version 3.10.6 Windows Installer (64-bit). Lastly, you’ll need an account on Hugging Face.
How to Install Stable Diffusion Web UI on Your PC
Here’s how to install the web UI for Stable Diffusion on your computer:
- Create a new folder on your desktop for Stable Diffusion. For instructional purposes, we’ll call this folder “ai”.
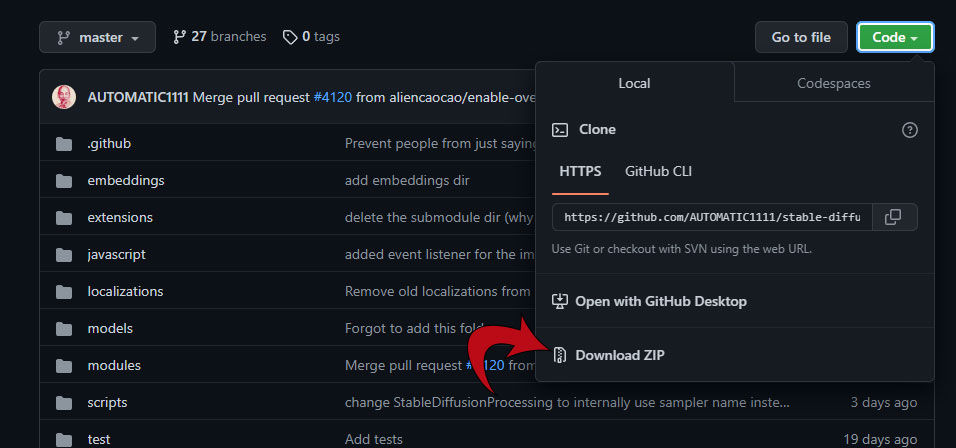
- Download the Stable Diffusion Web UI and extract the contents of the .zip to the folder you just created (“ai”).
- Download the sd-v-1-4.ckpt file from Hugging Face and place it in the …\ai\stable-diffusion-webui\models\Stable-diffusion folder.
- Download the GFPGAN V1.4 model from GitHub and place it in the …\ai\stable-diffusion-webui folder.
- Navigate to the …\ai\stable-diffusion-webui folder, and run the webui-user.bat file. Installation may take upwards of 30 minutes. Refer to the Common Problems section below if you run into any issues.
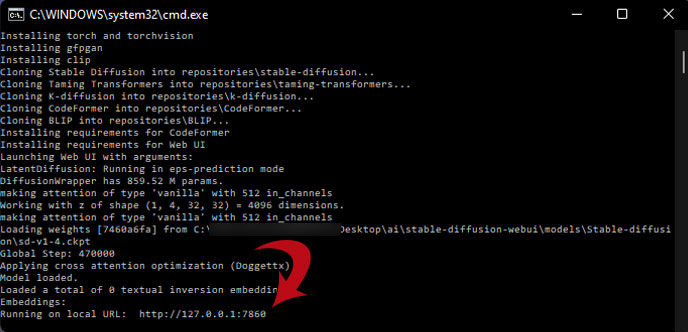
- After webui-user.bat finishes running, look for the following line on the command prompt window: “Running on local URL:” and copy the HTTP address. Place the address in your browser window (ex: http://127.0.0.1:7860/) to access the Stable Diffusion Web UI.
The URL (ex: http://127.0.0.1:7860/) is where you can use Stable Diffusion to start generating files using text2img or img2img. On the txt2img window, type in your Prompt (and Negative prompt), adjust the Sampling Steps, press Generate, and wait for your image to finish generating.
You will need to run the webui-user.bat file every time you want to use Stable Diffusion. However, running it after the first install will only take a few seconds.
Start Generating Images
After setting up the Stable Diffusion Web UI, it’s time to start generating some images! After going to the URL for the interface (ex: 127.0.0.1:7860), ensure the Stable Diffusion checkpoint is selected on the top left corner of the page. Then, you can enter a txt2img Prompt and hit Generate to create your first AI-generated image.
You can leave all of the settings the same and adjust “Sampling Steps” to start. The higher you put this, the longer the images take to generate. By default, Stable Diffusion is set to work best on 512x512px dimension images. There are add-ons that help create higher-resolution images, but manually adjusting the dimensions too high will probably result in this error:
RuntimeError: CUDA out of memory. Tried to allocate 16.29 GiB. If reserved memory is >> allocated memory try setting max_split_size_mb to avoid fragmentation. See documentation for Memory Management and PYTORCH_CUDA_ALLOC_CONF
Common Problems
Stable Diffusion webui-user.bat file does not open and returns Exit Code 9009 (Python was not found)
Solution 1. Open the webui-user.bat file (located in …\ai\stable-diffusion-webui) inside Notepad. Find the Python= line, and enter your python.exe install directory after the equals sign. For example Python=C:\python310\python.exe. Save the webui-user.bat file and relaunch it. If it still doesn’t work, try the next solution.
Solution 2. Reinstall Python (use version 3.10.6) and check the box to add the PATH on the first screen of the installation.
Cannot locate the webui-user.bat file in the Stable Diffusion folder
There are two files with the name webui-user, so you’ll need to enable File Explorer to show file extensions. To do this, click on View > Show > File Name Extensions, and then look for the file called webui-user.bat (file type is Windows Batch File).
It says Windows Protected your PC when running webui-user.bat
Press More Info and click on Run anyway. This Windows prompt pops up when you run certain file types in the operating system.
The Stable Diffusion installation freezes while running webui-user.bat
Press the spacebar in the command prompt window to unfreeze the installation. Sometimes, the installation hangs or freezes, so pressing the spacebar in the command prompt should resume it.
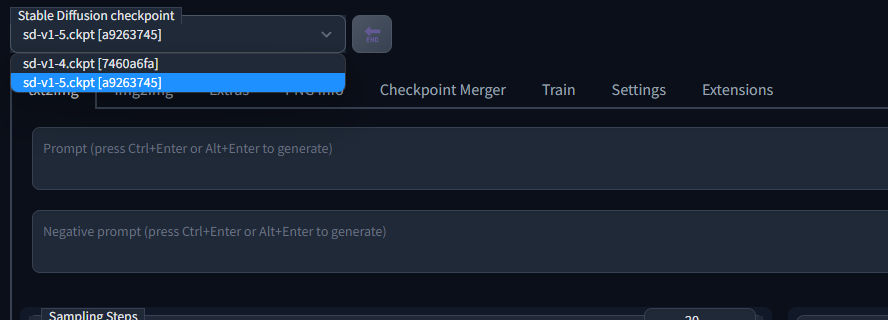
How do I update the Stable Diffusion Web UI to sd-v1-5.ckpt?
To update to the latest weights (.ckpt files), download the official file from Hugging Face, and place it in your …\ai\stable-diffusion-webui\models\Stable-diffusion folder. Inside the Stable Diffusion Web UI, press the End button on the top left, and select the new Stable Diffusion checkpoint from the dropdown menu.
That’s how you install the Stable Diffusion Web UI on your computer in a few easy steps. As soon as a new Stable Diffusion model is released, download it and move it into the models folder. Refresh your Web UI to begin using it.


