Fullscreen Gaming on Split Ultrawide Monitor – Guide
Use these solutions to allow fullscreen games and videos inside split ultrawide monitors.

For countless years I ran a three monitor setup, and everything worked pretty flawlessly, with a full-screen game or app taking up my middle monitor, Discord on the left, and chrome on the right. I wrongfully assumed that replicating this setup would be a breeze when I finally upgraded to a single ultrawide monitor. Getting a proper three monitor setup on a single ultrawide turned out to be more painful than I anticipated. The customization and software ecosystem for splitting ultrawide is just simply not up to snuff at the moment. Luckily for you, we put together this guide to overcome some of the frustrating hurdles when trying to game in a split zone within your ultrawide monitor.
The following image is the environment we are hoping to replicate. One ultrawide monitor is split into a large middle zone and two smaller side zones.

Here are some of the topics that this guide will cover:
- How to split screen (setup virtual monitors) with an Ultrawide
- How to full-screen games on a virtual monitor
- How to full-screen YouTube on a virtual monitor
- How to hide your taskbar
Ultrawide Split Monitor Fullscreen Gaming Setup (3 Monitors in One)
This guide shows you how to achieve full-screen capability for our applications within a split monitor. To start, we need to split our single ultrawide into three distinct zones. My Samsung G9 has a resolution of 5120×1440, and in this example, we will split it to create the following resolutions:
- Left Zone – 1280×1440
- Middle Zone – 2560×1440
- Right Zone – 1280×1440
Of course, you can change these resolutions around to your particular preference. These values are just what I found to be optimal.
Create Virtual Monitor Zones (Split Monitor)
Our screen splitting can be achieved for free with the well-supported FancyZones, or paid with the popular DisplayFusion application. DisplayFusion provides some extra features that I like, so it’s my preference, but either is a great option.
Free Option (FancyZones)
FancyZones is a part of the Microsoft PowerToys software suite, an excellent collection of tools the Microsoft development team provides to help customize your Windows experience.
- Download & Install PowerToys.
- Open PowerToys settings, either from the taskbar or by searching for it.
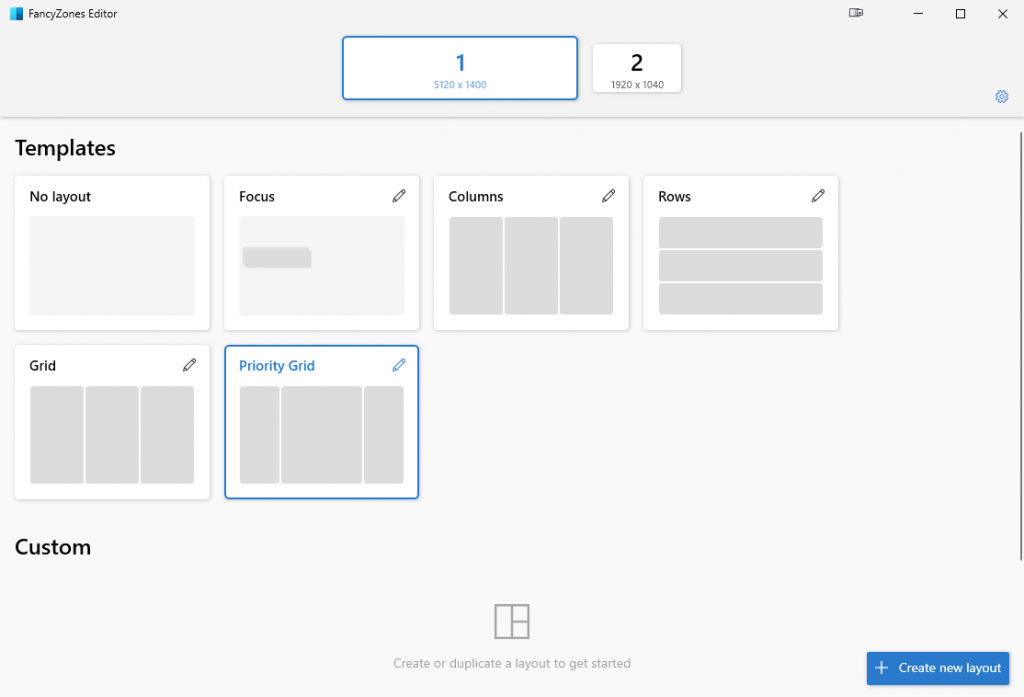
- Click on FanzyZones and Open the Layout Editor.
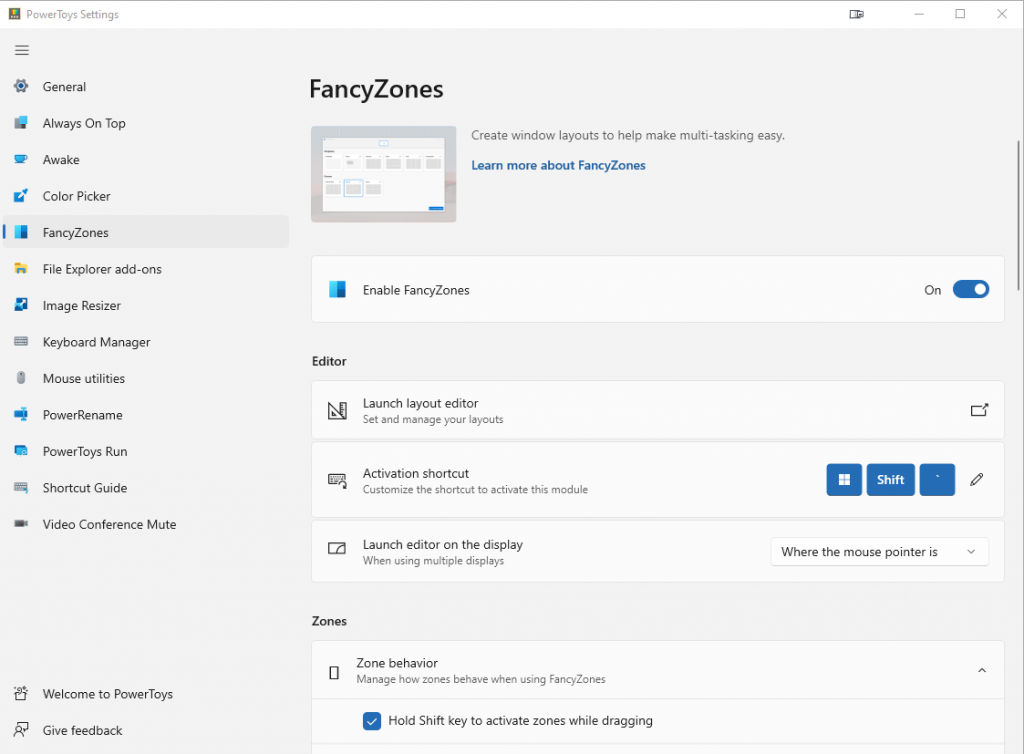
- Click on Priority Grid. If Priority Grid does not match the resolution you need, then click “Create New Layout.” Use the sliders to set up your zones to the desired resolutions.
That’s all you need to do to set up FancyZones. You can hold “shift” to see your zones while dragging a window.
Paid Option (DisplayFusion)
For most users, FancyZones will be more than enough. However, one feature I love about DisplayFusion is the ability to create and customize separate taskbars for each of my zones. This feature allows me to group my open windows to the zone they are in and customize each taskbar’s look. If the split taskbars aren’t an essential feature for you, using FancyZones is more than adequate.
- Purchase & Install DisplayFusion
- Right-click DisplayFusion in the taskbar and click Monitor Configuration
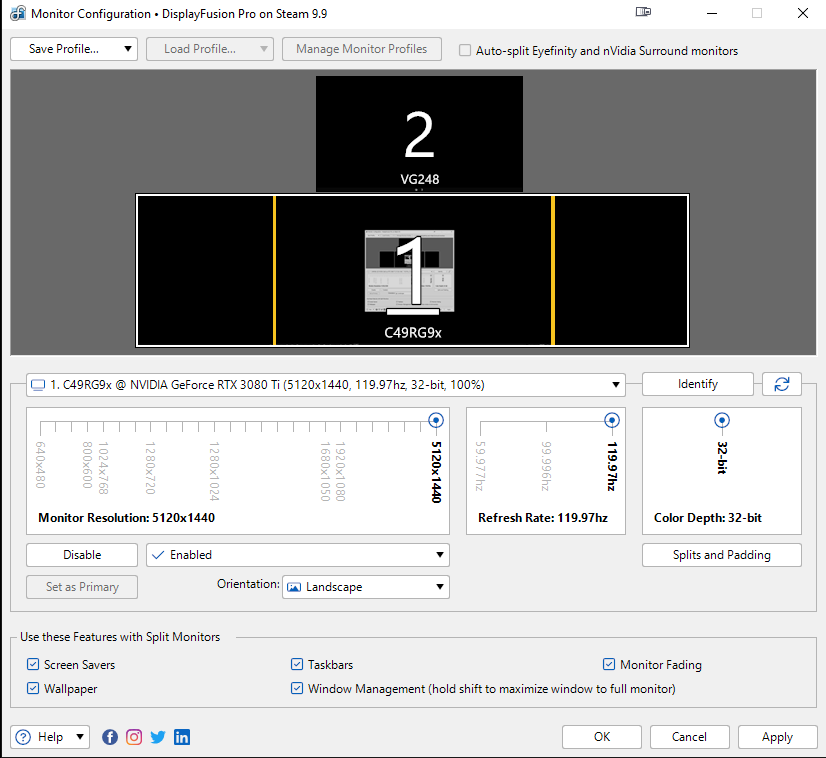
- Click on Splits and Padding
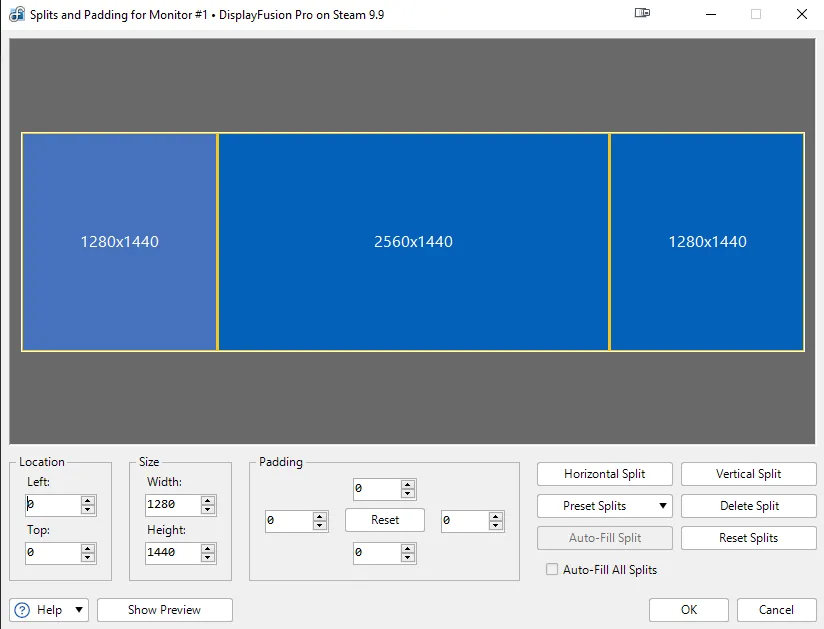
- Create two Horizontal Splits
- Use the Size and Location sections to create your resolutions and offsets. The middle screen will be offset left by 1280, and the right screen will be offset left by 3840.
DisplayFusions has tons of built-in features, including triggers, scripted functions, wallpaper management, etc.
Once you have either FancyZones or DisplayFusion installed, you will gain the ability to snap windows and maximize them in any of your three zones. For nearly all use cases, this is all we need. It works perfectly for simple programs like Chrome, Excel, VS Code, and more. However, if we try to full screen a YouTube video or open a video game, it will span the entire monitor. Let’s set up a workaround for that next.
Setup Borderless Gaming
At this point, things get dicey. There is no clean way of getting applications to full screen into your defined zone or virtual monitor. We will need to install a few different applications to reach our goal.
To get our games to work inside our virtual monitor, we will need to employ a workaround. Instead of playing our games in fullscreen, we will want to change them to Windowed or Borderless Windowed mode. Then, we will use a piece of software to adjust our game window resolution and center it to the middle zone.
Use an AutoHotKey Script
To make my windowed games fit correctly into the middle screen zone, I use an open-source AutoHotKey script. To get this script to work, you must install AutoHotKey and save the file.
- Download and Install AutoHotKey.
- Download and unzip the BorderlessGaming script to a familiar location.
- This script is open source and free to inspect. You can check out all the code on our Github.
- Double click on the BorderlessGaming.ahk script. It will begin idling in the taskbar.
- Launch your game and change the video settings to Windowed.
- Hit F12 to toggle the borderless mode. The resolution should change and the window will center to your screen.
- Hit F12 again to toggle the borderless mode off
You can also customize this script with a simple text editor if you would like to change the window resolution or left/right offset. Simply open up the script file and change the XOffset, ResWidth, and ResHeight variables.
Use Windows Borderless Gaming
Another free option to achieve this goal is Windowed Borderless Gaming. At the time of this writing, this project seems to be abandoned, but the developers may still have plans to update it and the software currently works.
- Download and Launch Windowed Borderless Gaming
- Right Click Windowed Borderless Gaming in your taskbar and tap Settings>Global Settings
- Check “Automatically set resolution” and set it to 2540×1440
- Check “Automatically set offset” and set the X parameter to 1280
- Tap “Save and Close“
- Launch a game and change the video settings to Windowed
- Hit F3, and Windowed Borderless Gaming will manipulate the game window for you.
If you use Windows Borderless Gaming, you might run into issues where your taskbar will always be above your game window. To solve this problem, I use a simple AutoHotKey script. You can install AHK here and then download the script here. Once the script is running, you can force a window up and down by hitting Window + CTRL + PGUP.
Fix Fullscreen Video
Now that we have gotten gaming sorted out, the next pain point is fullscreen video. If we open up a Youtube video in any major browser and full screen the video, it will once again span our entire monitor. There is a built-in solution for Firefox and Edge, but we will need to install an extension for Chrome.
Firefox and Edge
When hovering a video on Firefox or Edge, you will see a small picture and picture button. Click this button, and the video will pop out of the browser. Now you can use our previous AHK script from the gaming portion to fullscreen the Picture in Picture window.
Chrome
While Chrome does have an official Picture in Picture extension, it does not allow us to increase the window past a specific size. To help us, we can use a different extension called “Windowed.” Install this extension in Chrome, and you can then pop out a windowed version of your video when you hit the full-screen button.
All In One Solution – iShadow VDM (Paid)
To help you avoid the mess above, you can install a piece of software from iShadow called VDM. The program will run you $35.00 but will set up proper virtual monitors that programs will automatically fullscreen into. Your computer will essentially think it’s seeing three monitors. One issue I ran into with VDM was that the saved settings would reset fairly frequently. Eventually, it got too annoying to keep resetting those, and I stopped using the software.
You can purchase iShadow VDM here.
Honorable Mention – Monitor PBP
One alternative to our problem is using your ultrawide monitor’s built-in Picture by Picture (PBP) capability if it has it. PBP will only allow you to split your Ultrawide down the middle so that you won’t get the resolutions discussed in the guide. To achieve this, you will need to run a second display cable from your monitor to your video card and then enable PBP from your monitor settings. Refer to your monitor manufacturer to see how to do this.
There you have it. You’re now able to do fullscreen gaming on a split ultrawide monitor. It’s not the most straightforward process, but once you get everything set up, it’s not too bad. Hopefully, Microsoft PowerToys will add fullscreen capability into FancyZones in the future. There has been some discussion inside their GitHub, and it should be entirely possible. Feel free to reach out if you have any better solutions than those listed above.
For more guides, check out our tech guides section!


