How to Enable Secure Boot on Gigabyte Motherboard
Learn how to enable Secure Boot on a Gigabyte motherboard in Windows 11 so you can improve system security.

Secure Boot is a security feature that prevents certain types of malware from gaining access to the Windows operating system. Some malware can bypass antivirus and antimalware software to gain control of the system, and Secure Boot improves overall system security by verifying the bootloader. Some games, like Valorant, require Secure Boot to be enabled, so you may be struggling with enabling it on your PC. Follow the guide below if you need to know how to enable Secure Boot on a Gigabyte Motherboard.
In this guide, we’ll show you how to enable Secure Boot on a Gigabyte motherboard specifically. The steps are similar for most motherboards, but it’s possible to get confused by how different manufacturers label things in the BIOS.
How to Enable Secure Boot on Gigabyte Motherboard
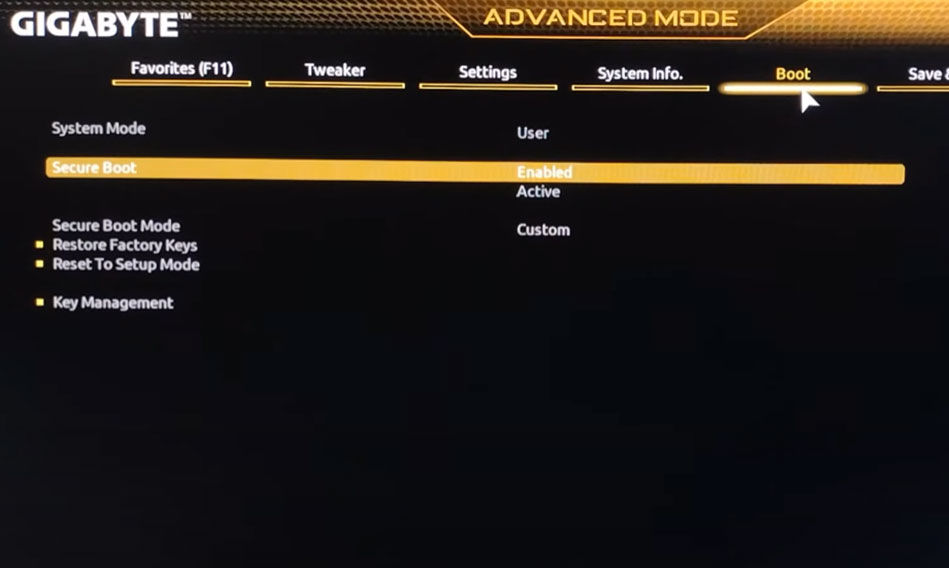
To enable Secure Boot on a Gigabyte motherboard:
- Restart your computer
- Press the DEL key on startup to enter BIOS
- Navigate to the Boot tab
- Click on Secure Boot
- Change Secure boot to Active
When attempting to enable Secure Boot in the BIOS, you may see an error that says:
“Secure Boot can be enabled when System in User Mode. Repeat operation after enrolling Platform Key(PK).”
Follow these steps to resolve this issue:
- Navigate to the Boot tab
- Click on Secure Boot
- Change Secure Boot Mode to Custom
- Select Restore Factory Keys
After that’s done, you can follow the steps outlined above to enable Secure Boot.

How to Check if Secure Boot is enabled on Windows
To check if Secure Boot is enabled:
- Press the Windows key
- Type in System Information and hit enter
- Go to the System Summary Tab
- Find and check the Secure Boot State
- If it says On, Secure Boot is enabled

That’s how to enable Secure Boot for a Windows PC running on a Gigabyte motherboard and how to check if Secure Boot is currently enabled in Windows 11!


