How to Delete Preview Files in Adobe Premiere Pro
Preview files can take up gigs on your hard drive if you don’t delete them.

If you’ve noticed that your Adobe Premiere Pro is taking up a lot more space than usual, it may be because of your project’s preview files. Believe it or not, these can add up quickly and take up gigs of space if you’re regularly editing your videos. You can delete these files safely without impacting your actual project, as they are just temporary files that will be re-created if you re-load the project.
If you can’t find the file folder for your video preview file folder, you may have moved it. This guide will also cover how to find your preview file folder, delete preview files from individual projects, and set up a new file directory for your preview files.
What are Preview Files in Adobe Premiere?
According to the Adobe Website, Preview Files are files created on a project when rendering complex video portions, such as Masks. To play back the video in the small preview window above your video’s timeline, Adobe needs to render it so that it’s viewable. Once you’re done with a project, these files can accumulate and take up a lot of storage space, so it’s best to delete them.
Deleting Old Media Preview Files in Adobe Premiere Pro
To delete Media Preview Files in Adobe Premiere Pro, you must navigate to your Adobe folder and manually delete the files from your computer by moving them to the trash bin, then select Delete Files in your Trash. If you didn’t know about Preview files and have yet to delete them from each project, you’ll want to delete the old ones in your directory.
- On Windows, the file default directory is: User\Documents\Adobe\Premiere Pro\22.0
- On macOS, the default file directory is: Documents\Adobe\Premiere Pro\22.0
Windows users that use OneDrive may have to navigate to User\OneDrive\Documents\Adobe\Premiere Pro\22.0.
Finding a Lost Preview File Folder in Premiere Pro
Video editors can set the desired folder for video preview files. This method also allows you to locate your old preview files.
Finding and Setting Preview File Folder for Windows
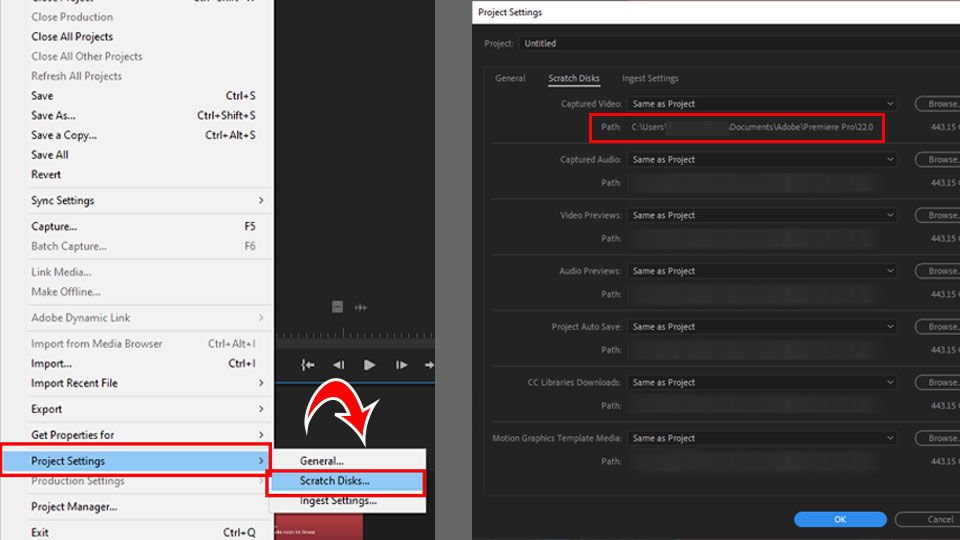
To find and set your preview file folder in Adobe Premiere Pro on Windows:
- Open a project in Adobe Premiere Pro.
- Click File and hover over Project Settings.
- Select Scratch Disks.
- Look next to Path: to determine where your preview files are.
- Hit Browse, then select your new folder to set a new folder for your preview files.

Finding and Setting Preview File Folder for Mac
To find and set your preview file folder in Adobe Premiere Pro on iOS devices:
- Open a project in Adobe Premiere Pro.
- Click Premiere Pro and hover over Preferences.
- Select Scratch Disks.
- Look next to Path: to see where the preview files are.
- Hit Browse, then select your new folder if you want to set a new preview file folder.
Deleting Preview Files from Individual Projects
Moving forward–you can get in the habit of deleting the Preview Files for your projects as you complete them. You can do this within the Adobe Premiere App by following the directions below.
Deleting Preview Files from Individual Projects on Windows
Follow these instructions on Windows:
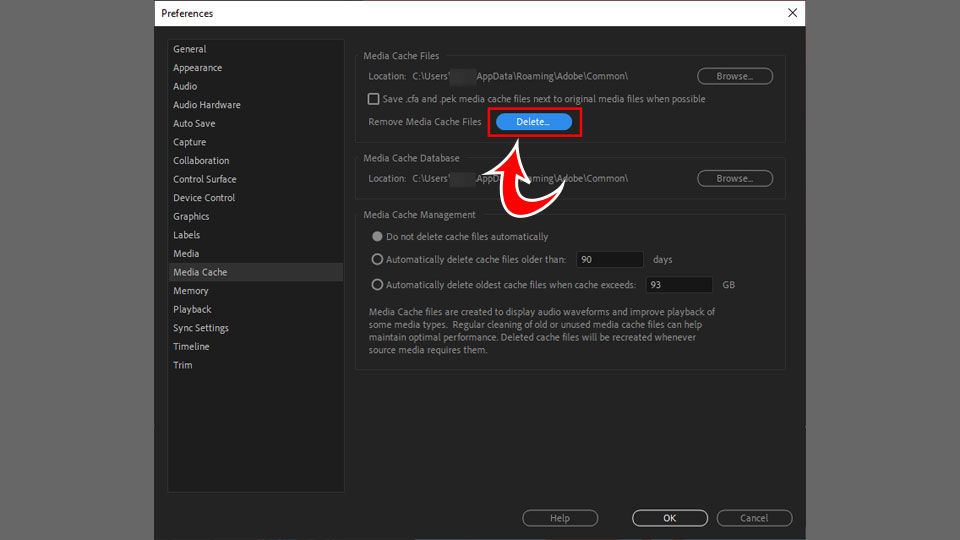
- Open the project that you want to delete the preview files.
- Select Edit.
- Hover over Preferences.
- Click Media Cache.
- Click the Delete button next to Remove Media Cache Files.
- Confirm your choice.

Deleting Preview Files from Individual Projects on iOS
Follow these instructions on iOS:
- Open the project that you want to delete the preview files.
- Select Premiere Pro.
- Hover over Preferences.
- Select Media Cache.
- Select the Delete button next to Remove Media Cache Files.
- Click OK.
Deleting Preview Files May Improve PC Performance
If your drive keeps running out of space, deleting these accrued preview files might free up the space you need to run Premiere more smoothly. You should get into the habit of deleting preview files from projects you’re working on so that they don’t build up.
Like many other Adobe Premiere Pro processes, there are many things behind the scenes you might not be aware of. Hopefully, this guide helped you free up some space by deleting those preview files.
If you liked this guide, see our other guide on reducing echo in Adobe Premiere Pro.


