How to Make a Roblox Auto Clicker
Quit wasting time clicking for hours. Learn how to write your own Roblox auto clicker.

If you like Roblox games, you will be doing one thing a lot: clicking. Roblox has thousands of clicking-style games where you need to repeatedly click to earn some type of currency that is then traded for upgrades, items, rebirths, pets, and more. You can imagine that non-stop clicking is going to get old quickly. Because of this, many games offer an auto clicker as a premium upgrade, but we have another solution. Read on to learn how to make your own Roblox auto clicker.
Make Your Own Auto Clicker In Roblox
To make a Roblox auto clicker, you can use a small scripting program called AutoHotKey. AutoHotKey will allow you to write a script that automatically simulates mouse clicks as it runs in the background while playing Roblox.
Although AutoHotKey might look slightly intimidating if you’re a beginner, the process is very simple. Before we start, we will need to go over some prerequisites.
Step 1: Install AutoHotKey
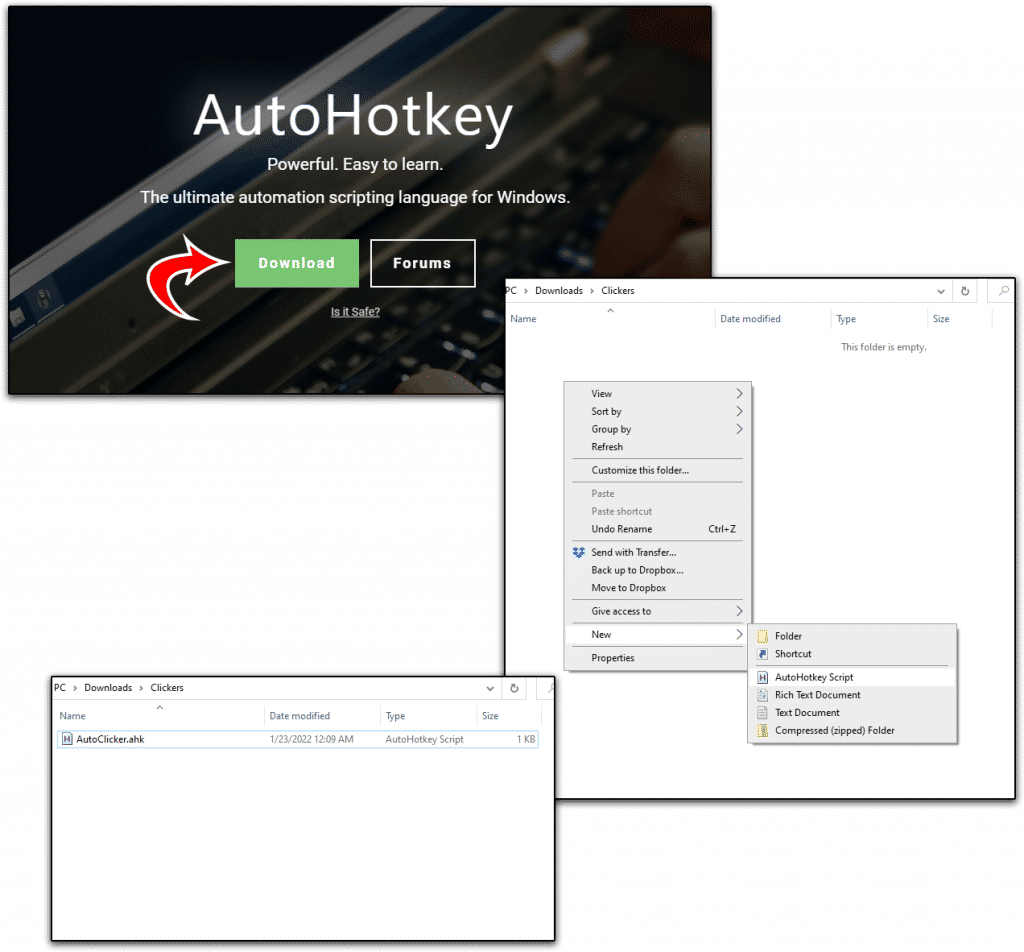
First, let’s install AutoHotKey. Head over to the official AutoHotKey website and download and install the latest version. Once installed:
- Pick a Folder
- Right Click
- Select New
- Click AutoHotKey Script

Name the script whatever you like, and then open the new file in notepad or any other text editor you prefer.
Step 2: Create the Auto Clicker Script
Next, you will paste one of the following scripts into the new notepad file. Once you’ve pasted one of the scripts below, simply double-click the file, and the script will be running in the background.
Boot up your Roblox game and either toggle or hold your auto clicker key to have continuous clicks. You can go to your taskbar at any time to disable the script.
We will develop two different scripts. One auto clicker will be enabled via a key toggle, and another will auto click while holding down a key.
Auto Clicker Toggle Script
#MaxThreadsPerHotkey 2
#NoEnv
SendMode Input
SetWorkingDir %A_ScriptDir%
toggle = 0
F9::
Toggle := !Toggle
While Toggle{
click
sleep 10
}
return
You can copy and paste this script into your opened AutoHotKey script notepad and run it. The F9:: line signifies the key to toggle the auto clicker. You can change this key if you like, but F9 is a good default key that doesn’t typically interfere with anything. The sleep 10 line is the time the script will wait between clicks, measured in milliseconds. You can increase or decrease this number if you feel it is necessary.
Once the script is running in the background, hitting F9 will enable the auto clicker, and then hitting it again will disable it. Remember that this script will start clicking wherever your mouse is, so make sure to place your mouse in the proper position. Disable to script if you need to move your mouse or click a menu.
Auto Clicker Hold Script
#MaxThreadsPerHotkey, 2
SetDefaultMouseSpeed, 0
SetBatchLines, -1
ListLines, Off
~$Tab::
While GetKeyState("Tab", "P"){
Click
Sleep 10 ; milliseconds
}
return
This script is slightly different than the toggle script. In this script, your mouse will only click while holding the Tab key. You can change your key by changing the two locations in the script where you see Tab. Similar to the toggle script, sleep is the delay between clicks.
I generally prefer this script over the toggle script since it’s easier to keep playing the game. You can just hold the click key down when you want clicks and then quickly let go to move around or do anything else. The toggle key script will obviously be necessary for AFK clicking.
You can use these scripts in many different Roblox games, including Blox Fruits, Arise Crossover, and tons more. Using and Auto Clicker and Roblox game codes, you’ll rack up all the rewards for your favorite game in no time. The great thing about this method is that you aren’t installing any untrustworthy software on your computer. AutoHotKey is a tried and tested open-source software package. If you have any questions about these scripts, please feel free to reach out. Happy clicking!


